Overview
Scenario: Battleline
Location: Winterfell
Date played: 18. tammikuuta 2014
We decided to have Battleline. So no roll for scenario.
Terrain was randomized as BRB 8th page 142. Then alternating order of putting terrain
Terrain were
- Ghost fence
- Blazing barricade
- Ghots fence
- Ghost Fence
- Mysterious River
- Fence
- Scree slope
So 5 obstacles. I was glad when we rolled them for that cannon protection.
Empire
General: Empire General
-
Lord
-
Lect Infantry (Character), Arch LectorGeneral, Enchanted shield, The War Altar of Sigmar259 points
-
Mage Infantry (Character), Battle Wizard LordLore of Shadow ( MIasma, Withering, Pendelum, Pit )200 points
-
Hero
-
Pries Infantry (Character), Battle WizardLore of Shadow (miasma), DIspel Scroll90 points
-
BSB Infantry (Character), Captain of the EmpireBattle Standard Bearer, Luckstone, full plate, shield108 points
-
Core
-
Halb1 52 Infantry, HalberdiersFull COmmand (regiment)342 points
-
Halb2 11 Infantry, HalberdiersDetachment66 points
-
Halb3 11 Infantry, HalberdiersDetachment66 points
-
Arch1 10 Infantry, ArchersRegiment70 points
-
Arch2 5 Infantry, ArchersDetach35 points
-
Arch3 5 Infantry, ArchersDetach35 points
-
Special
-
GC1 War machine, Great Cannon120 points
-
GC2 War machine, Great Cannon120 points
-
DK1 4 Monsterous Cavalry, Demigryph KnightsMusician , Champion252 points
-
DK2 4 Monsterous Cavalry, Demigryph KnightsMusician , Champion252 points
-
Rare
-
ST Chariot, Steam Tank250 points
-
Hur Chariot, Celestial Hurricanum130 points
-
Total: 2395 points
Cursed Kings
General: Loriel
-
Lord
-
Kha Infantry (Character), Khatep Grand HierophantHierophant330 points
-
Core
-
Horse1 5 Cavalry, Horse Archers70 points
-
Horse2 5 Cavalry, Horse Archers70 points
-
Horse3 5 Cavalry, Horse Archers70 points
-
Cha 3 Chariot, Skeleton ChariotsBanner bearer + Champion185 points
-
Arc1 20 Infantry, ArchersMus130 points
-
Arc2 20 Infantry, ArchersMus130 points
-
Special
-
Wsphi Monster, Khemrian WarsphinxFiery Roar, sting240 points
-
Scorp1 Monstrous Beast, Tomb Scorpion85 points
-
Scorp2 Monstrous Beast, Tomb Scorpion85 points
-
Knigh 3 Monsterous Cavalry, Necropolish KnightsFull Command + EBtS240 points
-
Stalk 3 Monsterous Beast, Sepulchral Stalkers165 points
-
Rare
-
Necro Monster, Necrosphinx225 points
-
Cask War Machine, Cascet of Souls135 points
-
SSC1 War Machine, Screaming Skull CatapultSkulls of the Foe120 points
-
SSC2 War Machine, Screaming Skull CatapultSkulls of the Foe120 points
-
Total: 2400 points
Deployment

Turn 1 - Cursed Kings
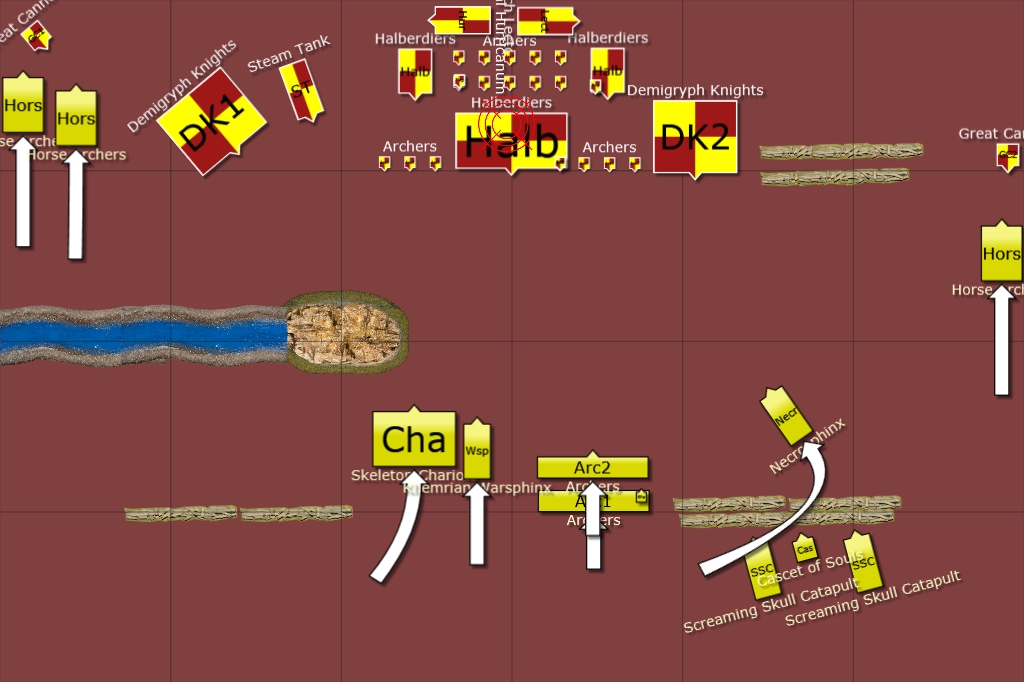
I went full speed ahead.
Magic was decent, most importantly I managed to cast vengeance on the halberdiers and reduced movement by 1. Casket got dispelled and desert winds failed even with reroll =(
At shooting, I managed to hit halberdiers with one of the catapults. Other missfired and lost this and next turn shooting. I also managed to kill few archers with my archers, invoked panic tests, but unfortunately they survived. I also managed to do single wound on cannon with horse archers (never say never when rolling dices)
Turn 1 - Empire
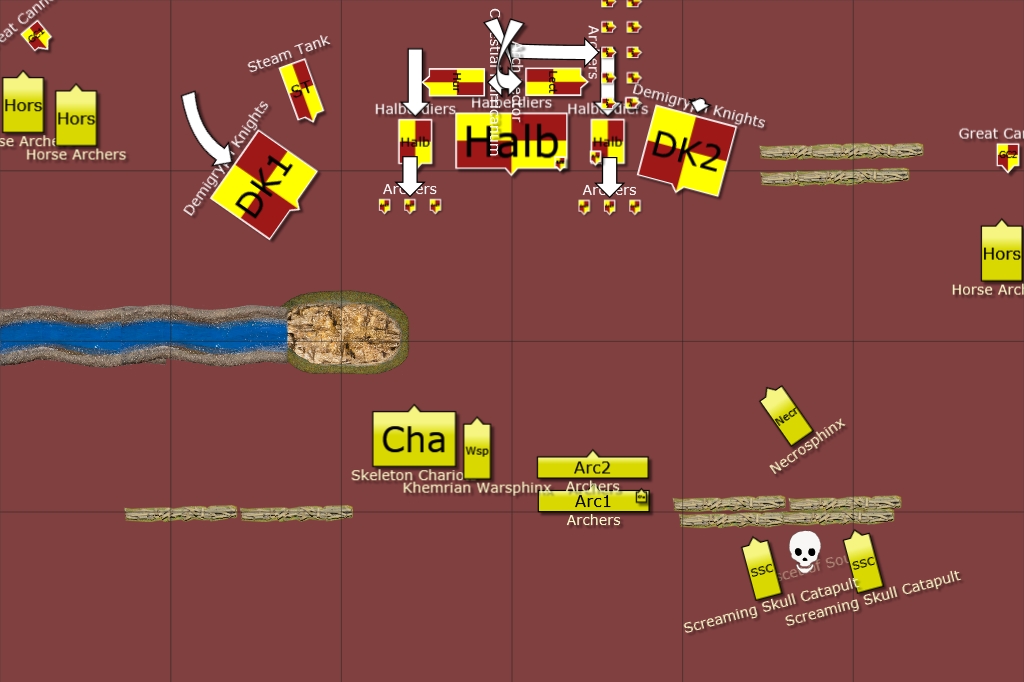
He decided not to risk dangerous terrain with his halberdiers and holded. He moved archers and detach halberdiers forward. He free reformed other archers whose has wizard on him moved away from hurriculum and arch lector. For some reason my opponent still pivoted his chariots around.
Magic was next to nothing (even though he had 12 dices.) Necrosphinx got miasma and his weapon skill was decreased.
At shooting he tried to shoot my warsphinx with steam tank but failed. He tried a lucky shot on my Casket so that he aimed that if he would roll exactly 2 he would hit... and of course the bastard rolled 2 on the first hit and directly hitted my casket and destroyed it. =( Last great cannon tried to nail necrosphinx but failed also.
Turn 2 - Cursed Kings
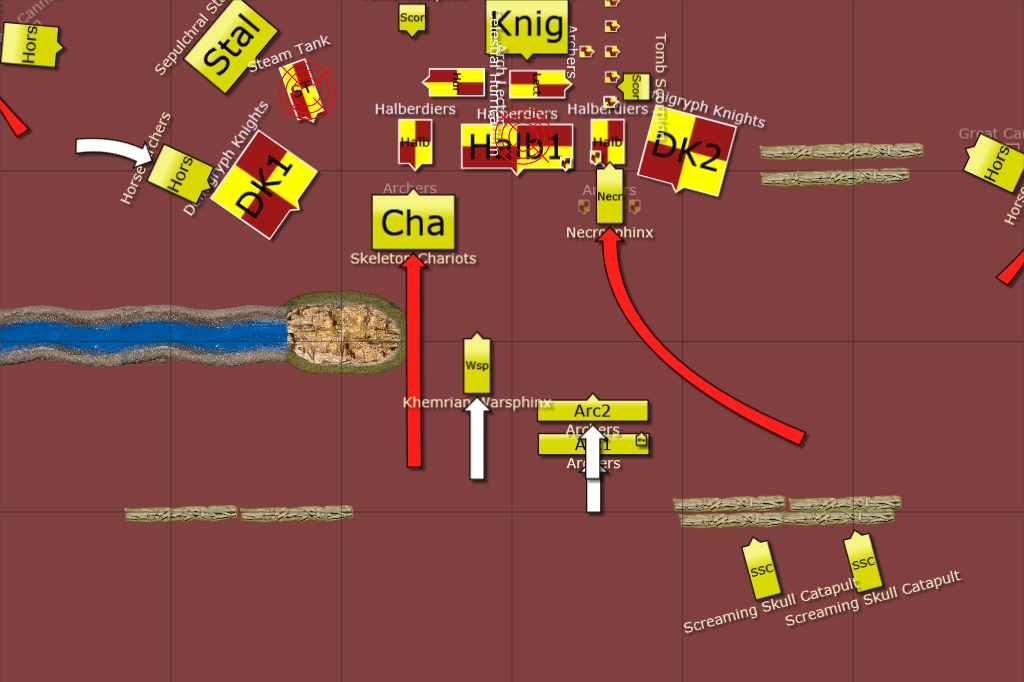
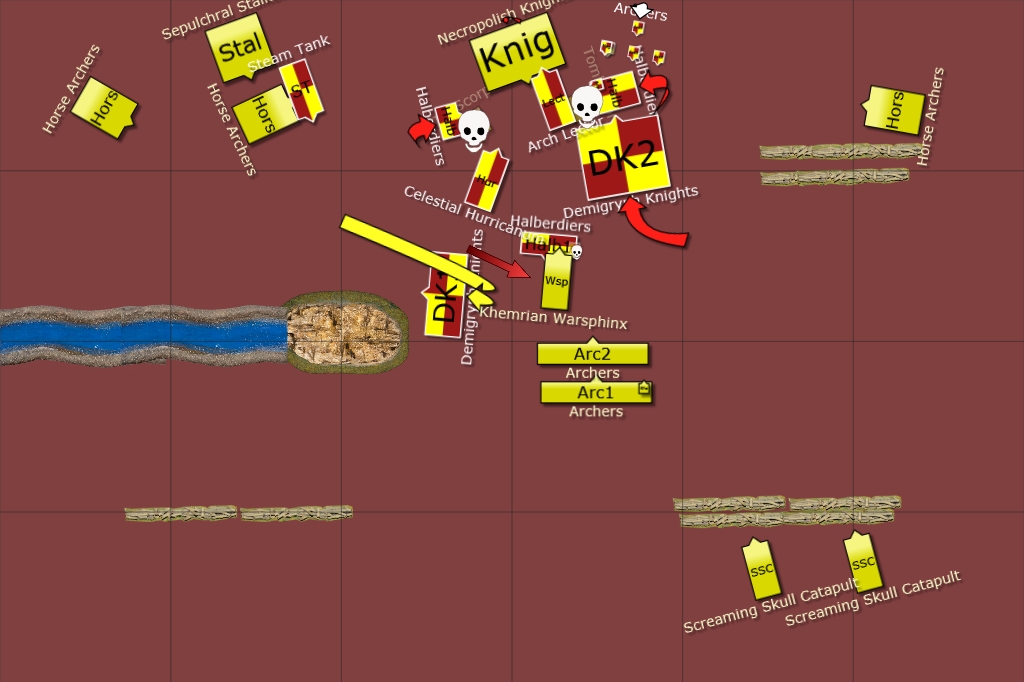
All of my EBtS landed and was either hit or scattered only for 2 inches.. I declared charges on cannons, then chariots charged past scree slope (passed DT test) and necrosphinx charged on the archers.
Magic was pretty decent. Casted vengenance again on the Halberdiers and this time reduced movement by 3.
At shooting I got nice hit with catapult killing about 10 halberdiers, no panic though. I also shot mage archer bunker. My sepulcharl stalkers got 2 + 10 + mf (with 2 wounds) and managed to do 4 wounds on Steam Tank!
At close combat chariots of course nailed those archers... I needed 3 to get to those halberdiers and rolled swift triple 1.... Necrosphinx overruned to halberdiers.
Turn analyze:
- Ok when I charged with my Necrosphinx it first looked that I could have overrun to Demigyphs. I tottally forgot that those skirmishers tighten up when they are charged... This was pretty darn bad mishap. I could only hope that T8 would save me from harms way.
- Skeleton Horse Archers really payed their points with Cannon kill. Too bad my opponent managed to destroy Casket...
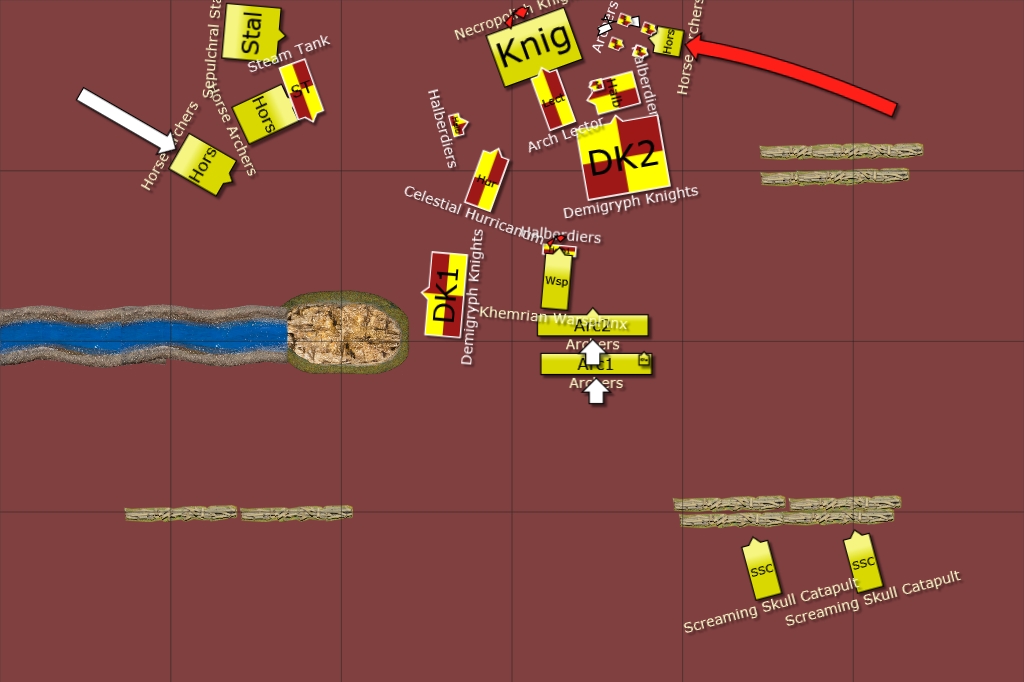
Turn 2 - Empire
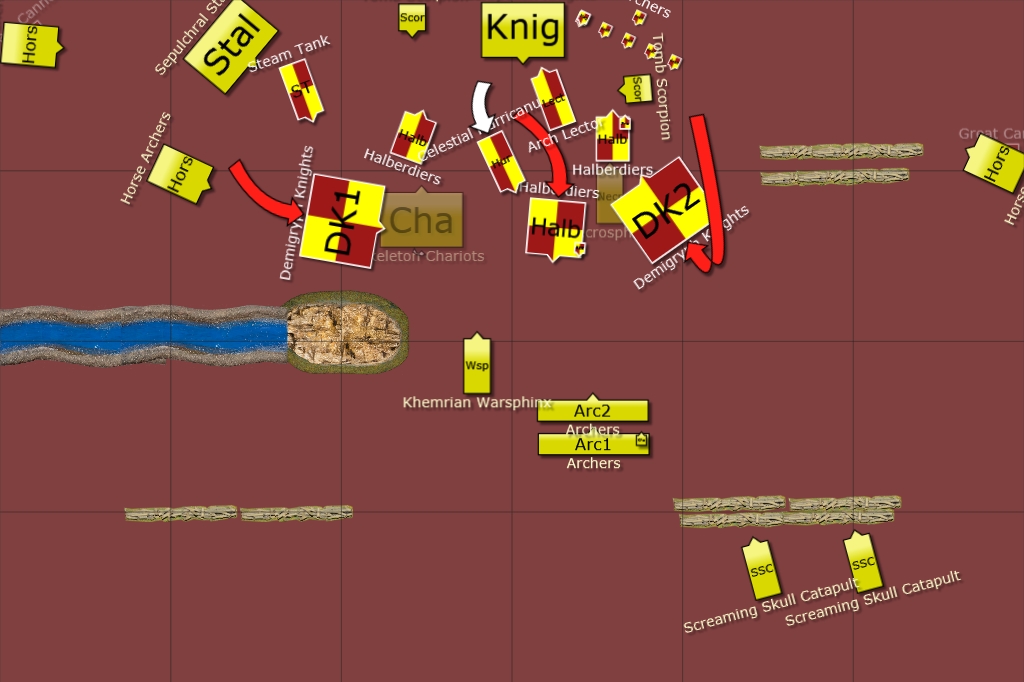
Steam Tank missfired (because of the wounds I made to it) and lost all its steam points. My opponent charged with Halberdiers and got about 5 models dead to dangerous terrain. He also charged with demigryphs to chariots and the other unit charged to necropshinx flank. He managed to move his archers just barely of tomb scorpion front arc, (this was very close) He reformed with other halberd unit.
Magic and shooting wasn't nothing spectacular.
At close combat those chariots almost survived due bad rolls of my opponent. He just barely exaclty got the right ammount of crumble on them. Necropshinx got murdered by too many attacks, too bad he didn't even get to chance to hit, since I could have killed his BSB or level 1 scroll caddy. Luckily my opponent reformed with halberdiers and again about 5- 6 models died with DT from vengeance and his Captain rexeiced a wound.
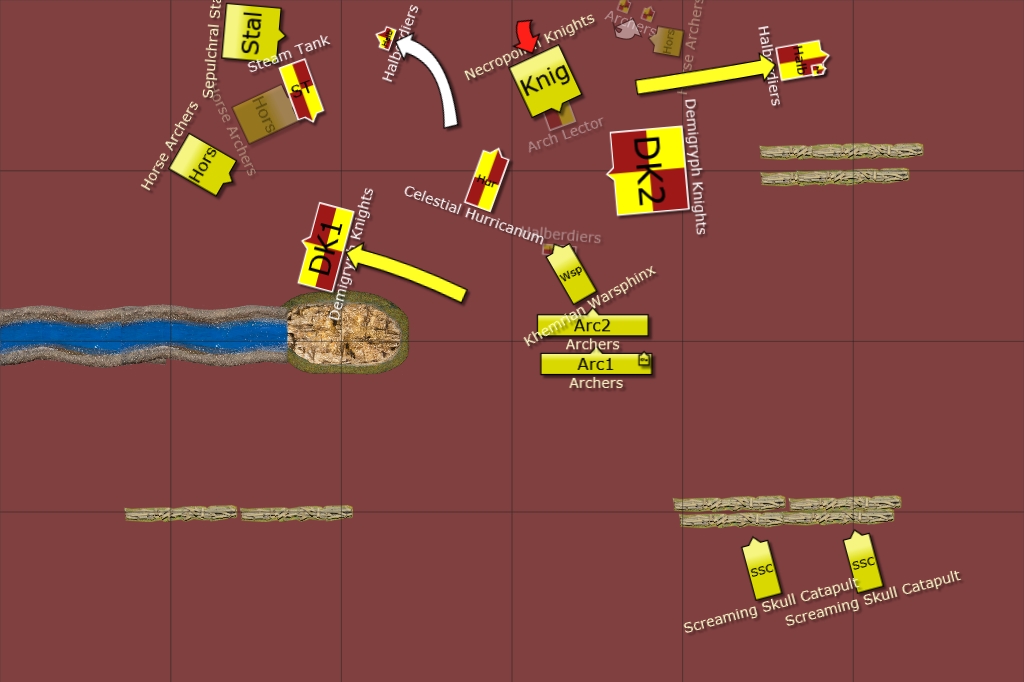
Turn 3 - Cursed Kings

I couldn't charge my scorpion to his mage bunker (that was really close call). My knights couldn't make a full charge because of the archer unit blocking their way... For some reason he left his hurriculum rear open for my other scorpion and I hoped for little overrun fun after war altar. I decided to charge steam tank with horse archers.
At magic I got 5+6 and my opponent managed to channel few dices. I tried to do desert winds with 2pd but he dispelled it. I tried to protection with 3 pd ard on my warpshinx but he dispelled it also. Then I casted 6 PD smiting and rerolled it to get IF. IF was small template and killed few dudes. Those horse archers that fought ST didn't get the buff (they would have gotten it if he wouldn't dispell them, also if the movement spell would have been succesfull my other archer unit could have shooted his mage bunker)
At shooting catapult tried to shoot demigryphs on the left, but failed to hit due scatter. My stalkers (were actually just 8 inches apart from gryphs) managed to roll AGAIN 10 + 2 + MF (only one wound, but killing one model in process) My acher 2 block had astounishin 40 shots on mage bunker archers, but I killed only 2 models and no panic test was invoked. My other archer unit managed to kill 4 or 5 halberdier detachment on the left side.
At close combat I did tons of wounds on arc lectors mount but my opponent rolled 4+ wards way above average. Still I won the combat but darn lector was stubborn. Hurriculum suffered few wounds but through lucky LD test passed break and then passed reforming from lost... (if i remember correctly he lost 2 wounds and I had charge + rear so lost by 5. and he didn't use BSB rolls on me this turn.. He used his reform move to clip my scorpion. At halberd fight I almost rolled the table over... Luckily he didn't do single wounds on Warsphinx, but I used breath weapon and all the extra attacks, and was it like 3 models dead. I did kill one with breath weapon and none with thunderstomps...
Turn 3 - Empire
Steam tank missfired again and all the steam points were lost. Demigryphs was able to do the charge because halberdiers were on the rear of the Scorp. Other demigryphs charged Warsphinx flank.
At magic he tried to cast bubble ward and rerolls to hit. I dispelled them both. He got miasma with WS lower to necropolish knights.
He actually forgot to shoot his archers this turn (realized just now when doing this report.)
At close combat he decided that we go Hurriculum first. Ha managed to kill my Scorpion with few wounds and CR. Then we did Arch lector fight. Too bad those demigryphs managed to kill the scorpion before he could even land a single hit. I decided to allocate every attack on the altar, since it gave him stubborn, long ld boost and bubble power spells. And if altar would die, then I got free stomps on the Lector. I don't know how many wounds I got to it (was perhaps 4 - 6) but he warded all but one. Then the most sucesfull fight. Demigryphs failed to land any wounds on sphinx (allthough he rolled lot of 5 ;) My crew member managed to Killing Blow hit to his Capt and this time sphinx managed to kill punch of them. Too bad those halberdiers remained steadfast and passed the test, but Demigryphs thank sweet lord of Nehekhara that they broke from combat.
Turn 4 - Cursed Kings
I tried to do long charge with horse archers to his mage bunker in the hope of breaking it, especially that he was giving his flank to me. Stalkers weren't in range of anybody so I reformed them.
At magic I tried to again bubble cast Smiting, but it got dispelled / or did I just failed to meet the cast value... I got 5 dices if I remember correctly.
At shooting I tried to shoot the demigryphs that werent fleeing, got scatter right in Celestial Hurriculum, but rolled 1 on high impact hit. Another catapult managed to get only partial hit and no wounds as expected. My archers shot that smaller halberdier unit and got few wounds in.
At close combat Warpshinx nearly anhilated those Halberdiers but they holded they ground with insane courage. Again I directed all my attacks to that darn altar and got no unsaved wounds through... This time I was able to make reform from win and bring the last dude on the fight. My horse archers failed miserabely on the flank charge, when He landed two attacks and wounded with both, and I didn't do nothing. Our combat res was tie so he reformed with LD test to face me.
Turn 4 - Empire
Steam tank missfired again, but this time it only losed its cannon. He grinded those horse archers off the table. He managed to rally those demigryphs. He reformed his other demigryphs and backed up with halberdiers.
Magic wasn't again anything too spectacular. I tried to kill his level 4 with Khatep cursed scroll when he casted Miasma again on the knights. Then dispelled both of his reroll to wound and ward boost from altar.
At close combat he killed my horse archers with his archers and reformed from victory. Then we fought our halberdier match and those demigryphs that JUST rallyed got panic test and failed it again. Arch Lectors altar finally collapsed and lector got stomped up, but didn't die survived with one wound, but broke from combat. I pursued and catched the bastard. When Lector died his mage bunker ran off the table and other halberdiers with level 1 scroll caddy took of too.
Turn 5 - Cursed Kings

My horse arches managed to catch fleeing demigryphs and destroyed them. Necroknights charged hurriculum and Warpshinx to remaining demigryphs.
At magic I casted smiting on warsphinx. I probably tried to cast Deccication or something to the demigryphs also, I dunno but it got fispelled.
At shooting I glared on the Steam Tank, got 8+MF (3 shooting and 3 MF) but still managed to land few wounds on the Tank. My catapult direct hitted it and destroyed the tank.
I first destroyed hurriculum then fought the Demigryphs, he didn't get any wounds to me I managed to do few and it was enough. They broke and I catched them.
At this point my opponent Yielded. Final score was 2620 - 670
The Report is Copyright (c) 2009 Loriel. All rights reserved.
This document is completely unofficial and in no way endorsed by Games Workshop Limited. Chaos, the Chaos device, the Chaos logo, Citadel, Citadel Device, Darkblade, the Double-Headed/Imperial Eagle device, 'Eavy Metal, Forge World, Games Workshop, Games Workshop logo, Golden Demon, Great Unclean One, GW, the Hammer of Sigmar logo, Horned Rat logo, Keeper of Secrets, Khemri, Khorne, the Khorne logo, Lord of Change, Nurgle, the Nurgle logo, Skaven, the Skaven symbol devices, Slaanesh, the Slaanesh logo, Tomb Kings, Trio of Warriors, Twin Tailed Comet Logo, Tzeentch, the Tzeentch logo, Warhammer, Warhammer Online, Warhammer World logo, White Dwarf, the White Dwarf logo, and all associated marks, names, races, race insignia, characters, vehicles, locations, units, illustrations and images from the Warhammer world are either (r), TM and/or (c) Copyright Games Workshop Ltd 2000-2007, variably registered in the UK and other countries around the world. Used without permission. No challenge to their status intended. All Rights Reserved to their respective owners.
Component (c) Tom Wright 2010. All rights reserved.
Component by Tom Wright is licensed under a Creative Commons Attribution-Non-Commercial-Share Alike 3.0 Unported License.
Component (c) Tom Wright 2009. All rights reserved.
Component by Tom Wright is licensed under a Creative Commons Attribution-Non-Commercial-Share Alike 3.0 Unported License.
Rock in image cast from a mold (c) Woodland Scenics 2009. All rights reserved. Used without permission
Component (c) 2010 Gerry Elliott. All rights reserved.
Component by Gerry Elliott is licensed under a Creative Commons Attribution-Non-Commercial-Share Alike 3.0 Unported License.
Component (c) Aaron Port 2009. All rights reserved.
Battle Chronicler Component by Aaron Port is licensed under a Creative Commons Attribution-Non-Commercial-Share Alike 3.0 Unported License.
Component is Copyright (c) 2009 Tom Wright. All rights reserved.
Component by Tom Wright is licensed under a Creative Commons Attribution-Non-Commercial-Share Alike 3.0 Unported License.
