Overview
Scenario: Battleline
Location: Winterfell
Date played: 5. tammikuuta 2014
We decided to have Battleline. So no roll for scenario.
Terrain was randomized as BRB 8th page 142 say, but one of my Friends girlfriend placed terrain as she she wanted
Terrain were:
- ANvil of Vaul
- Elwen Waystone
- Mysterious forest
- Bulding
- Building (watchtower)
- Ghost Fence
- Ghost Fence
- Fence
Empire
General: Empire General
-
Lord
-
Lect Chariot (Character), Arch LectorGeneral, shield, The War Altar of sigmar258 points
-
Mage1 Infantry (Character), Battle Wizard LordDispel Scroll, Lore of Shadow, Talisman of Persevation245 points
-
Hero
-
Pries Cavalry (Character), Warrior PriestArmour of Destiny, Warhorse, Shield129 points
-
BSB Infantry (Character), Captain of the EmpireBattle Standard Bearer, Enchanted shield, Full plate armour96 points
-
Mage2 Infantry (Character), Battle WizardDispel Scroll, Lore of Beast90 points
-
Core
-
Halb 47 Infantry, HalberdiersFull COmmand312 points
-
Arch 10 Infantry, Archers70 points
-
ICK 8 Cavalry, Inner Circle KnightsFull Command230 points
-
Special
-
Great 40 Infantry, Great SwordsFull Command470 points
-
GC Warmachine, Great Cannon120 points
-
Rare
-
ST Chariot, Steam Tank250 points
-
Hur Chariot, Celestial Hurricanum130 points
-
Total: 2400 points
Cursed Kings
General: Loriel
-
Lord
-
HLP Infantry (Character), High Liche PriestLevel 4, Lore of Nehekhara, Hierophant Dispel Scroll, Golden mask, dragonbane gem300 points
-
TK Infantry (Character), Tomb KingDestroyer of Eternities, Dragon helm, potion of foolhardines, shield268 points
-
Hero
-
Nec Infantry (Character), NecrotectIroncurse icon, Obsidian amulet95 points
-
Core
-
Ske 52 Infantry, Skeleton WarriorsFull Command238 points
-
H 5 Cavalry, Horse Archers70 points
-
Cha 3 Chariot, Skeleton Chariots165 points
-
Arc 20 Infantry, ArchersMus130 points
-
Special
-
TG 40 Infantry, Tomb GuardFull Command + Halberds Banner of swiftness565 points
-
Wsphi Monster, Khemrian WarsphinxFiery Roar, Envonomed Sting240 points
-
C 3 Warbeast, Carrion72 points
-
Rare
-
Cask War Machine, Cascet of Souls135 points
-
SSC War Machine, Screaming Skull CatapultSkulls of the Foe120 points
-
Total: 2398 points
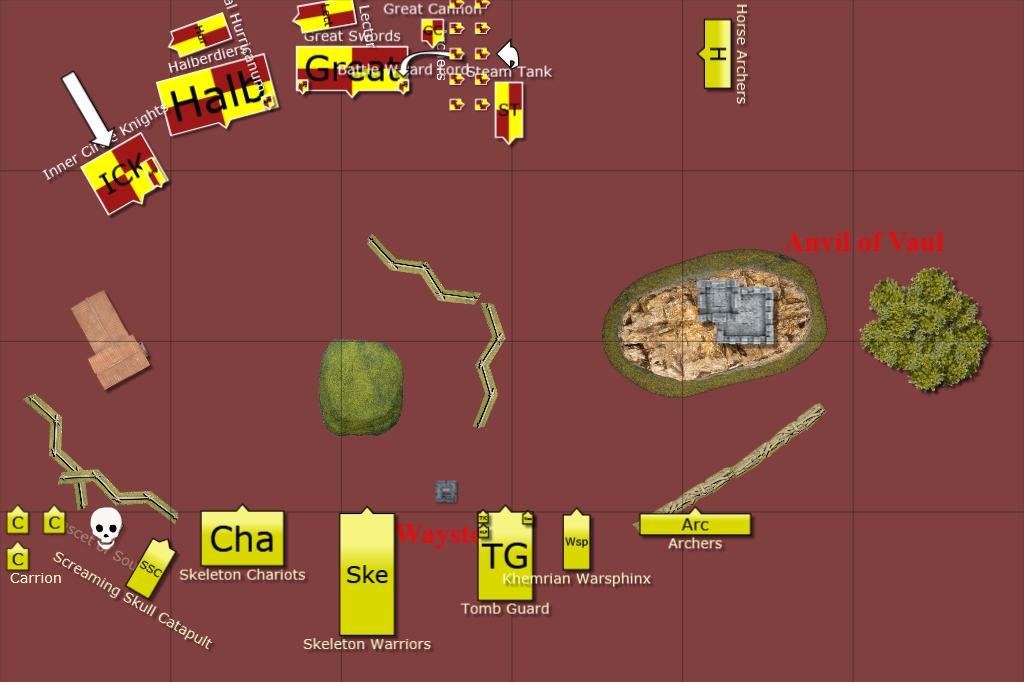
Deployment

I won the first deployment.
My hierophant got Desert Winds, Cursed sword, Protection and Smiting..
Empires level 1 choosed Wyssan's Wildform and level 4 got Miasma, Enfeeble foe, Withering and Pendelum.
My opponent got first turn.
Turn 1 - Empire
My opponent used 3 steam points. He missfired and lost cannon this turn.
He left his mage from archer unit and joined Great Swords
On magic he used big version of pendulum and shot my Casket. He got double sixes. We got a little argument about the obstacle and bouncing cannon ball. We decided to play it out that pendulum doesn't stop there. Now after game I think it might actually still stop the pendulum. Too bad he killed Casket.
On shooting he tried to cannon Sphinx, but failed.
Turn 1 - Cursed Kings
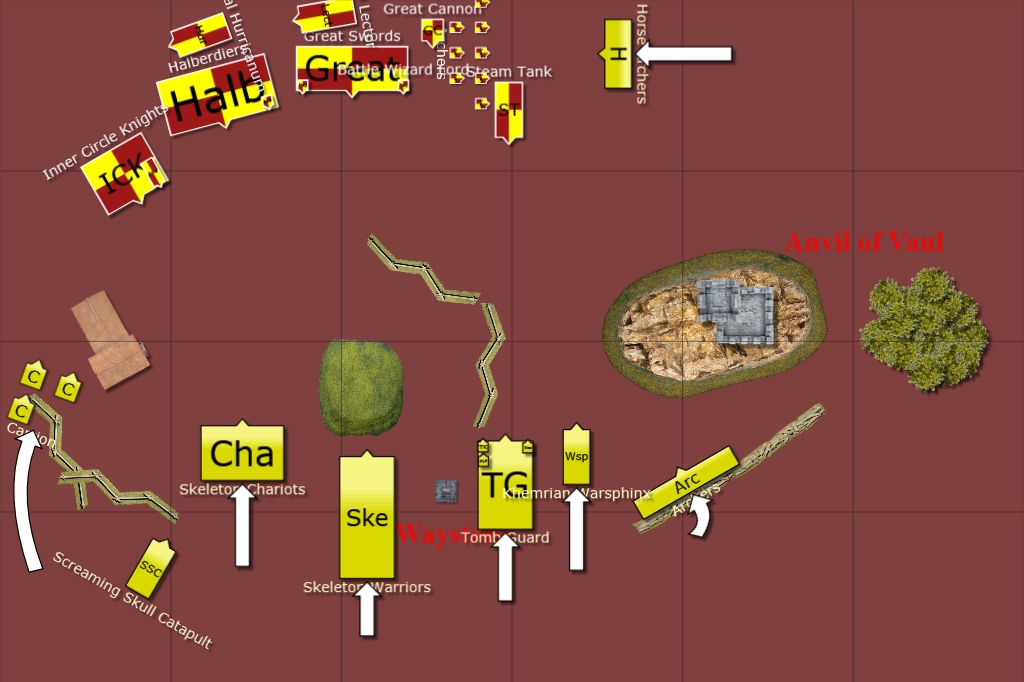
I did full advance in all fronts.
On magic I got cap. I tried cast big version of desert winds, but my opponent dispelled it. Then I used 5+ ward to warsphinx and multi shot for chariots.
At shooting I tried lucky shotting his BSB with skull catapult but it scattered away. Chariots managed to kill few halberds. Horse archers managed to kill few archers.
Turn analyze:
- Desert Winds dispel was a set back.
Turn 2 - Empire
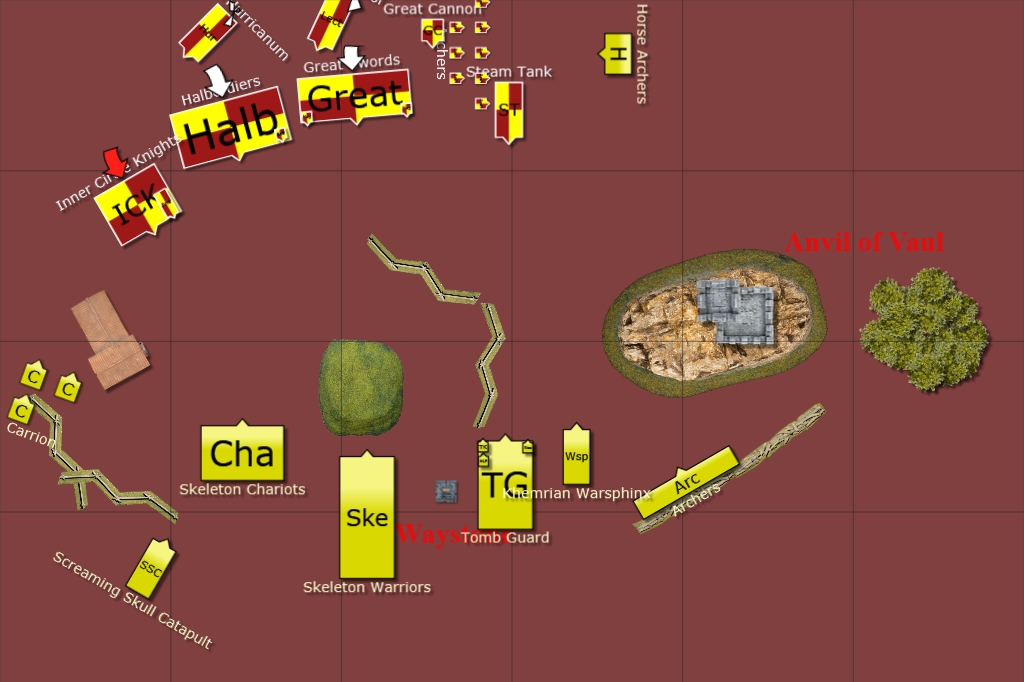
Steamtank used 3 points and missfired again, losing his engine this turn. Inner Circle Knights tried to charge on chariots. My opponent did little moving around.
During magic he tried penduluing warpshinxx on little version. I let it go since it neede something like 25 inches to reach the target. Then I tried dispelling miasma, but failed. luckily he only got 1 movement off from tomb guards
On shooting cannons managed to do single wound on Sphinx. He also killed 3 horse archers.
Turn 2 - Cursed Kings

I double charged inner circle knighst. Then advanced on all fronts.
At magic I tried to use small desert winds, but it got disppelled. Then I bubble smited. Those carrions were just inch apart from getting boost. Horse archers resurrected to full
At shooting my catapault missfired and destroyed as result of it. My archers were just in range of his archers and almost killed them. Horse Archers finished the job. Too bad no panic.
At close combat I got 10 impact hits wounds, Most important part was that I managed to fear those knights.
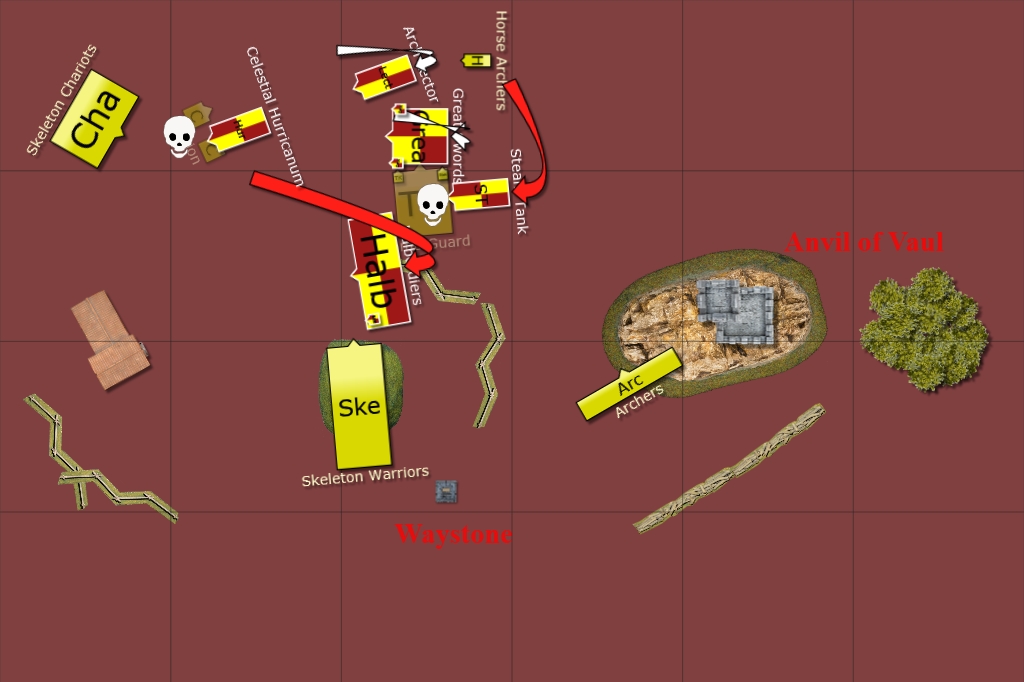
Turn 3 - Empire
Steamtank once again missfired and engine broke. He moved a bit.
During magic he shot pendelum again. I letted it go again since, it was still rather long away, but that was wrong decision. I dispelled miasma on tomb guard.
At shooting steam tank shot tomb guards (that fence was little more middle to the unit so bouncing ball didn't hit it) Steam tank used steam gun and only 1 model was left.. Great cannon missfired and destroyed.
Turn 3 - Cursed Kings

I charged carrions to hurriculum, Tomb Guards to Great Swords and skeletons against halberdiers. (carrions would have overrunned on halberdiers if they would win the combat.
I reformed chariots, moved archers forward.
At magic I tried to cast protection to Tomb Guards, but he scrolled it. Then I casted smiting on them, he tried to dispel it but failed dispelling. Last I tried to desert winds, but failed the cast.
On close combat I didn't semi ok on Great Sword combat. Hurriculum + Altar was great boon on the unit and he managed to win combat slightly. He also killed my necrotect. Carrions got draw on the combat.
Turn analyze:
- I think I made the biggest mistake in this game during this turn. I REALLY should have moved that single horse archer to block Steam tank... I don't know what an earth I was thinking with the move I made. I realized this during magic phaase. Too bad I failed Desert Winds cast, since that would have been REALLY REALLY helpfull, since that extra 4 inch movement would have blocked halberdiers flank charge and horse archer would have been able to block steam tank. On retrospective I should have forced it with more dices to it.
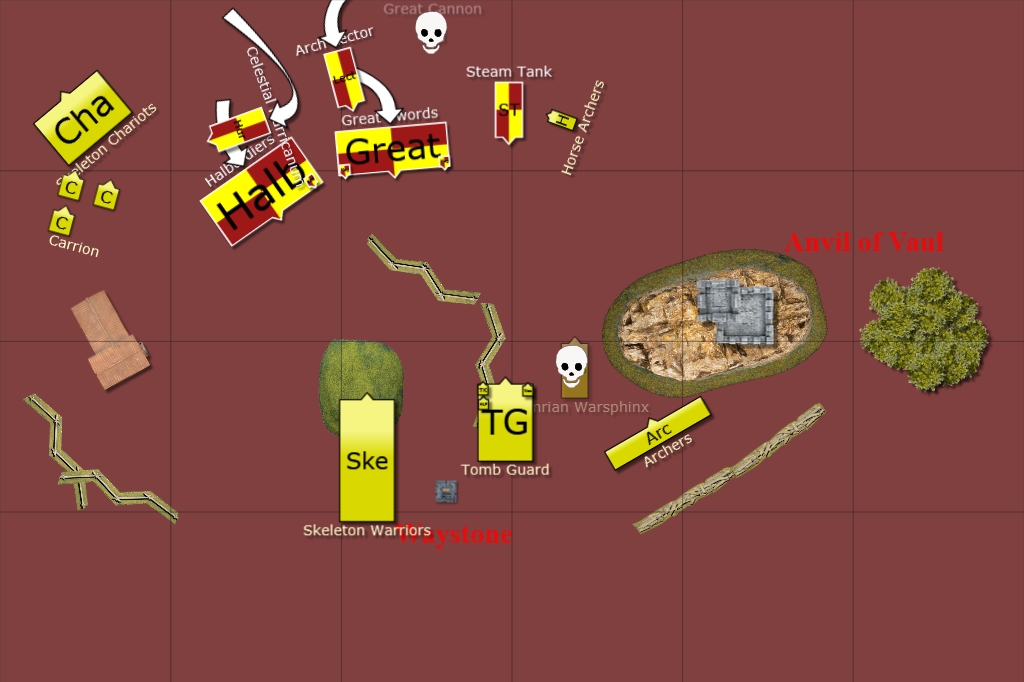
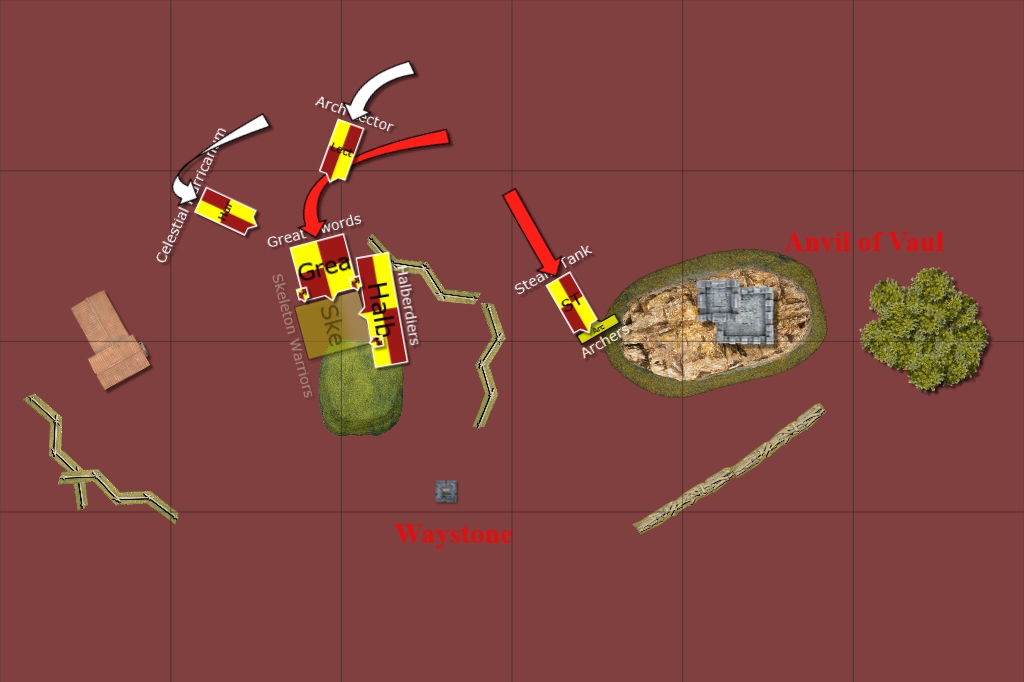
Turn 4 - Empire
He double charged my tomb guards from both flanks.
On magic he managed to got bubble 5+ ward. He also tried miasma tomb guards, but I dispelled it.
He smashes those tomb guards to hell. He killed 10 models just with Stank and eventhough his Halberdiers failed Fear test he actually hitted very nicely with them. I managed to do Heroic Killing Blow on captain of empire, but he managed to 5+ ward it. When my hierophant died I didn't receive any damage from instant crumble! Some lucky dices on ld 5 test. This picture is little off. Those skeleton Warriors were very close so that those Halberdiers just barely managed to fit on the flank of tomb guard. He reformed to that I was at his front, even though one of my model was cliping in flank side.
Turn 4 - Cursed Kings

My horse archers died on crumble. Skeletons losed few models also. Chariots and archers managed to pass the test.
My skeleton warriors were indeed in his front arc, and I had to charge on the front... I decided to try to break the unit with chariot charge. I tried to kill his BSB with every attack I could muster, but naturally failed it. He really hurted my skeletons and killed those chariots like butter.
Turn analyze:
- On point perspective I should have charged hurriculum. There was actually really nice possibilities if that horse archer would have survived. Overrun from hurriculum would have hitted arch Lector and if horse archer would have pinned them in combat I could have even destroyed it. But horse archers died so no point there.
Turn 5 - Empire
Turn 5 - Cursed Kings
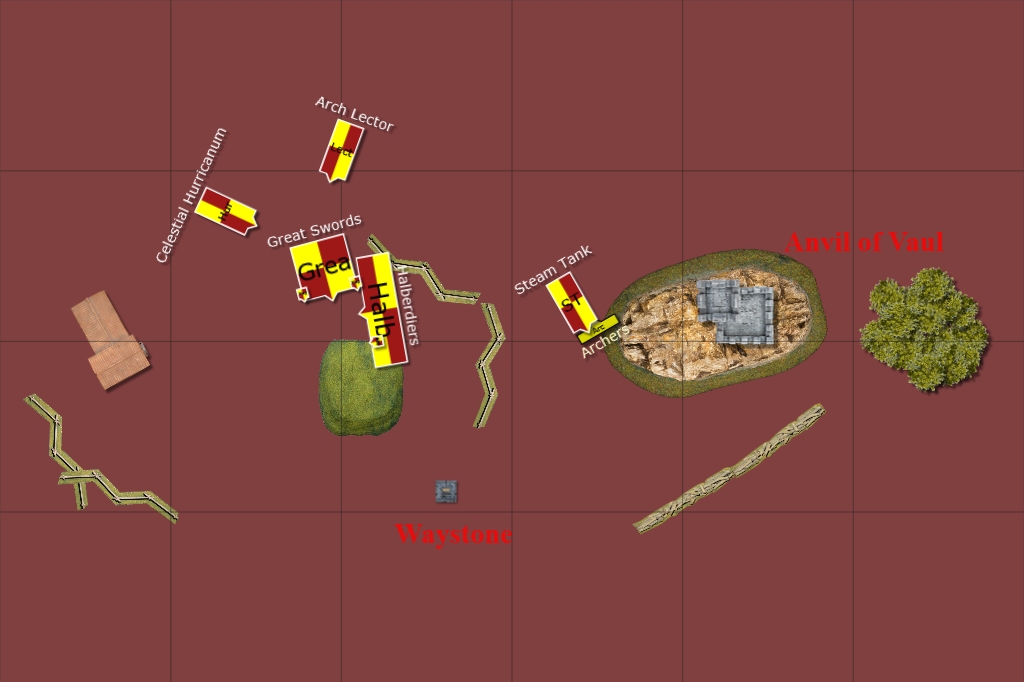
Turn 6 - Empire

Final score was 2548 - 574.
On this kind of infantry list redundant desert wind liche would have been nice. I don't say that I would have won the game, but I really would have had more chance if I really would have used that single horse archer more properly...
The Report is Copyright (c) 2009 Loriel. All rights reserved.
This document is completely unofficial and in no way endorsed by Games Workshop Limited. Chaos, the Chaos device, the Chaos logo, Citadel, Citadel Device, Darkblade, the Double-Headed/Imperial Eagle device, 'Eavy Metal, Forge World, Games Workshop, Games Workshop logo, Golden Demon, Great Unclean One, GW, the Hammer of Sigmar logo, Horned Rat logo, Keeper of Secrets, Khemri, Khorne, the Khorne logo, Lord of Change, Nurgle, the Nurgle logo, Skaven, the Skaven symbol devices, Slaanesh, the Slaanesh logo, Tomb Kings, Trio of Warriors, Twin Tailed Comet Logo, Tzeentch, the Tzeentch logo, Warhammer, Warhammer Online, Warhammer World logo, White Dwarf, the White Dwarf logo, and all associated marks, names, races, race insignia, characters, vehicles, locations, units, illustrations and images from the Warhammer world are either (r), TM and/or (c) Copyright Games Workshop Ltd 2000-2007, variably registered in the UK and other countries around the world. Used without permission. No challenge to their status intended. All Rights Reserved to their respective owners.
Component (c) Tom Wright 2009. All rights reserved.
Component by Tom Wright is licensed under a Creative Commons Attribution-Non-Commercial-Share Alike 3.0 Unported License.
Rock in image cast from a mold (c) Woodland Scenics 2009. All rights reserved. Used without permission
Component (c) 2010 Gerry Elliott. All rights reserved.
Component by Gerry Elliott is licensed under a Creative Commons Attribution-Non-Commercial-Share Alike 3.0 Unported License.
Component (c) DeeDee 2009. All rights reserved.
Component by DeeDee is licensed under a Creative Commons Attribution-Non-Commercial-Share Alike 3.0 Unported License.
Model made with bricks from a Hirst Arts Fantasy Architecture mold.
Component (c) Tom Wright 2010. All rights reserved.
Component by Tom Wright is licensed under a Creative Commons Attribution-Non-Commercial-Share Alike 3.0 Unported License.
Component is Copyright (c) 2009 Tom Wright. All rights reserved.
Component by Tom Wright is licensed under a Creative Commons Attribution-Non-Commercial-Share Alike 3.0 Unported License.
Component (c) Aaron Port 2009. All rights reserved.
Battle Chronicler Component by Aaron Port is licensed under a Creative Commons Attribution-Non-Commercial-Share Alike 3.0 Unported License.
