Overview
Scenario: Battleline
Location: Winterfell
Date played: 12. November 2013
We rolled terrain using the BRB 8th page 142 method
4 x Mysterious Forest
Building
Fence
Ghost Fence
Wall
Anvil of vaul
Setlement of order ( 1 set fence, 1 building, sigmarite shrine
Dwarf Gunline
General: Seal
-
Hero
-
Engi1 Infantry (Character), Runesmith?Or lord I aint sure70 points
-
Engi2 Infantry (Character), Master Engineer70 points
-
Core
-
Thund1 10 Infanry, Thunderers140 points
-
Thund2 36 Infanry, ThunderersMusician504 points
-
BT1 War Machine, Bolt Thrower45 points
-
Special
-
BT2 War Machine, Bolt Thrower45 points
-
BT3 War Machine, Bolt Thrower45 points
-
Can1 War Machine, Cannon90 points
-
Can2 War Machine, Cannon90 points
-
Can3 War Machine, Cannon90 points
-
Can4 War Machine, Grudge Thrower80 points
-
Can5 War Machine, Grudge Thrower80 points
-
Can6 War Machine, Grudge Thrower80 points
-
Rare
-
Can7 War Machine, Organ Gun120 points
-
Can8 War Machine, Organ Gun120 points
-
Total: 1669 points
Cursed Kings Beneath the Sands
General: Loriel
-
Hero
-
LP Infantry (Character), Liche PriestLevel 2, Lore of Nehekhara, Hierophant, steed Magic items: Opal amulet & Ironcurse Icon135 points
-
Heral Infantry (Character), Tomb HeraldSteed,, BSB, Banner of the Hidden Dead189 points
-
Nect Infantry (Character), NecrotectCloak of Dunes, General110 points
-
Apop Infantry (Character), Prince Apophas130 points
-
Core
-
Horse 31 Cavalry, HorsemenFull Command, Light armor464 points
-
H1 5 Cavalry, Horse Archers70 points
-
H2 5 Cavalry, Horse Archers70 points
-
H3 5 Cavalry, Horse Archers70 points
-
Special
-
Scorp1 Monstrous Beast, Tomb Scorpion85 points
-
Scorp2 Monstrous Beast, Tomb Scorpion85 points
-
Knigt 3 Monsterous Cavalry, Necropolish KnightsFull Command, EBtS240 points
-
Stalk1 3 Monsterous Beast, Sepulchral Stalkers165 points
-
Stalk2 3 Monsterous Beast, Sepulchral Stalkers165 points
-
Stalk3 3 Monsterous Beast, Sepulchral Stalkers165 points
-
Rare
-
Cask1 War Machine, Cascet of Souls135 points
-
SSC2 War Machine, Screaming Skull CatapultSkulls of the Foe120 points
-
Total: 2398 points
Deployment
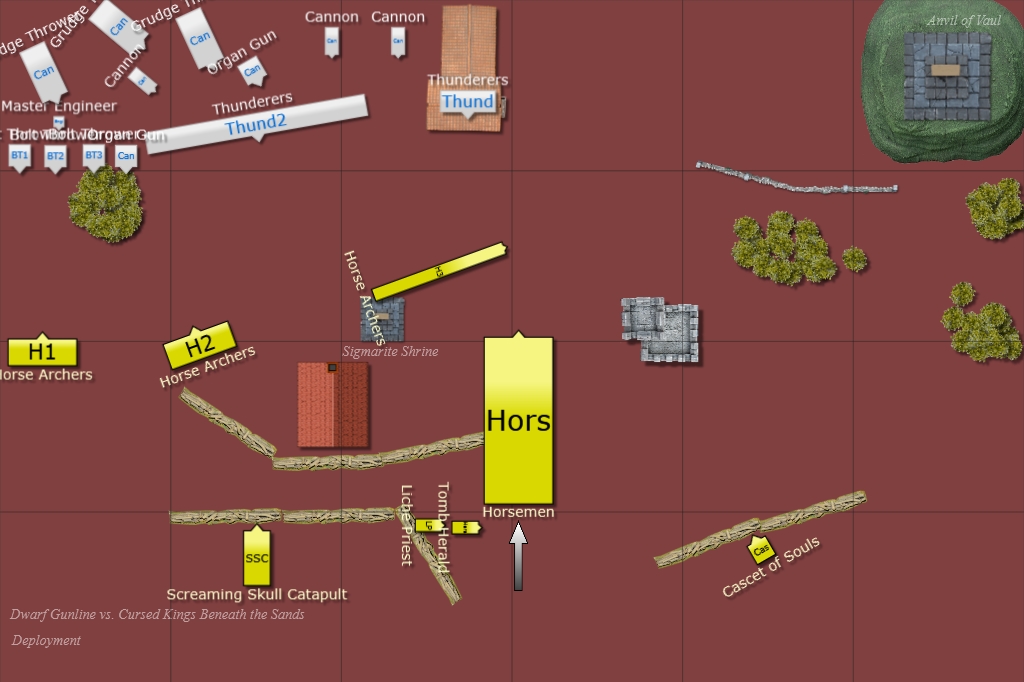
Ok. I dropped Horsemen first, then warmachines and then characters. I decided to risk my characters in order to get that precious vanguard movement and get that Banner of the Hidden dead closer to enemy lines in order to get most benefit out of it. I put those characters side ways and few millimeters of the deployment line, so it would be impossible for organ gun / thunderers / quarrellers to shoot them at first turn
.
Magic: I rolled double 5 so i switched my choice for protection and then signature the other.
My opponent burrowed pretty deep in the corner.
I managed to lost starting turn.
Turn Analyze:
- I actually like my tactic alot, and it had a great potential. That Herald would have got about 17 inc movement in first turn and that buble would have been very nice to utilize in turn 2. Especially IF i would have started the game.
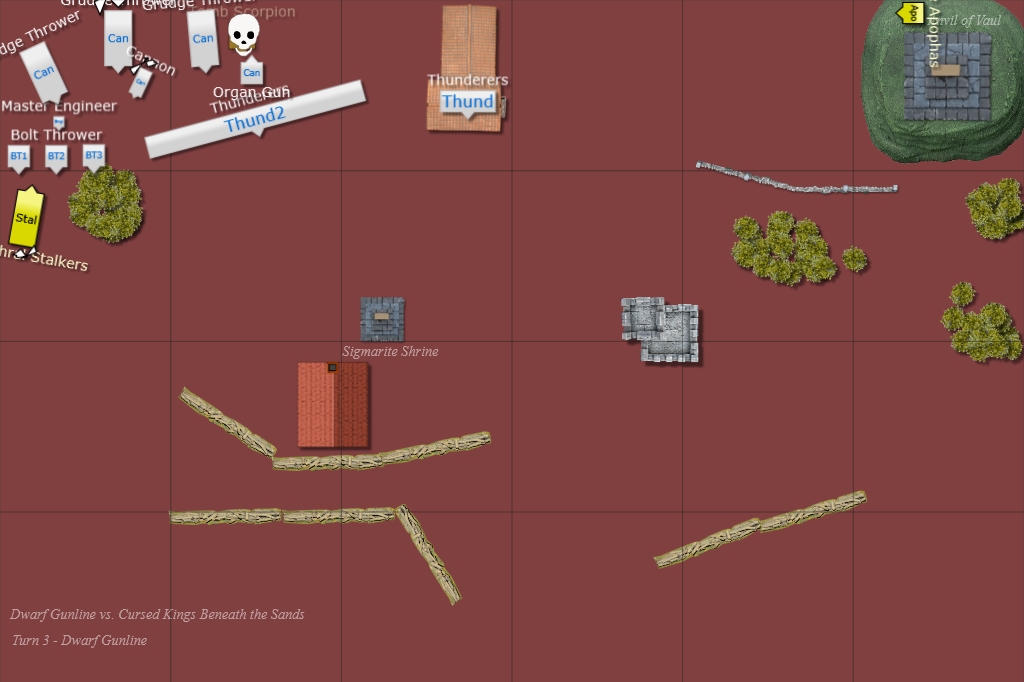
Turn 1 - Dwarf Gunline

No movement or magic dwarfs ;)
Shooting was pretty intense. He obviously managed to wipe my horse archers from the left flank, he managed to hit with single bolt thower to my catapult and killed it. (needed 7+ to hit (hard cover + long range) and wounded with 5+ and rolled 5 when multple wound. He tried to kill my BSB, but failed due Look out sir (he hadn't shoot my horsemen when that happened.) Two of the cannons tried to kill casket, but one got hit by fence and other missed.
Turn analyze:
- Good shooting little luck with catapult. Nothing over the top That Master Engineer. Those engineering runes are superp!
Turn 1 - Cursed Kings Beneath the Sands
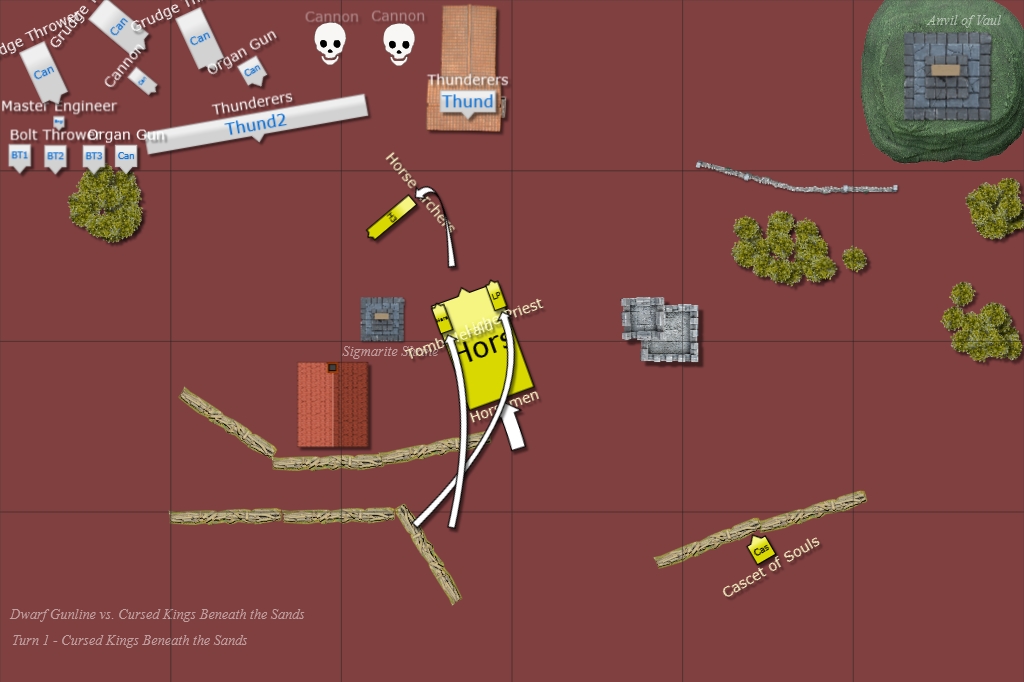
I couldn't move much with those horse men, since my tail couldn't go more than 8 inches from those characters. (that last model was actually in the left flank, but I don't know how to manipulate those units.)
Magic: I Rolled 2 & 3 for WoM and 3 from casket. I tried to two dice desert wind with level 2 and rolled snake eyes. Then I used 6 dice with casket. I got below average roll and my opponent decided not to use scroll rather than just dispel and failed it (was it by 1) I managed to kill two cannons with casket, then it stopped.
No shooting for me
Turn Analazy:
- That horsemen movement really wasn't enough and since i lost the first turn I really got my self in bad situation.
Turn 2 - Dwarf Gunline
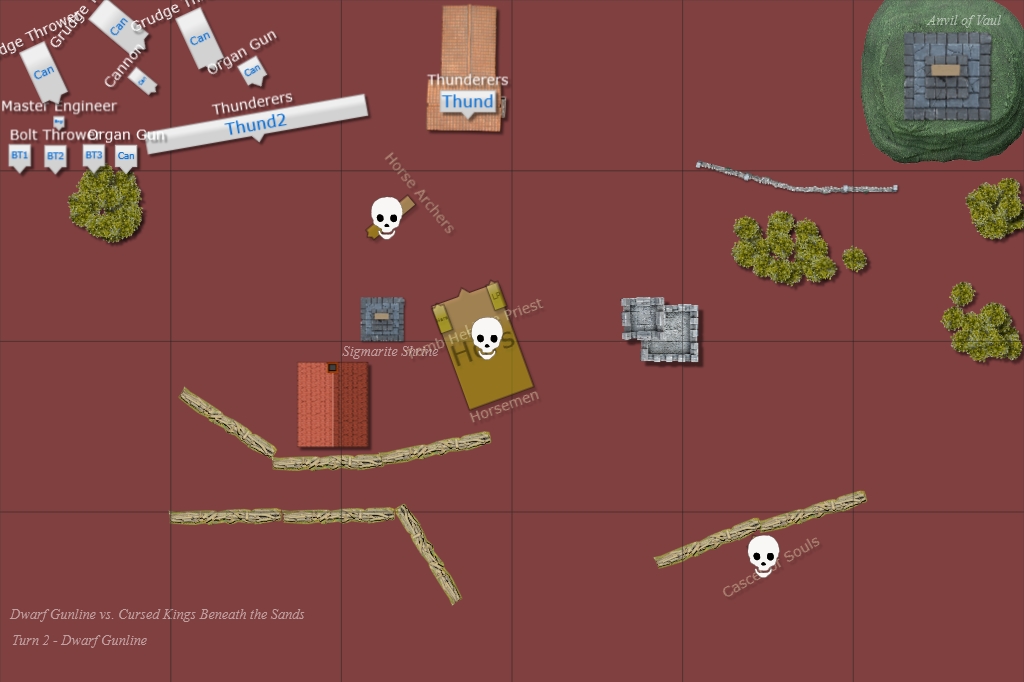
No movement or magic for dwarfs.
Shooting was devastating. He managed to cannon my casket, wiped horsemen and both of my characters out. He had flaming attacks with one of the grudge throwers and managed to strip hierophant regenetaion. I totally forgot that I had ironcurse icon on. I also failed opal amulet save.
Turn analyze:
- This was fun situation, I was left with absolutely no models in the board.
Turn 2 - Cursed Kings Beneath the Sands
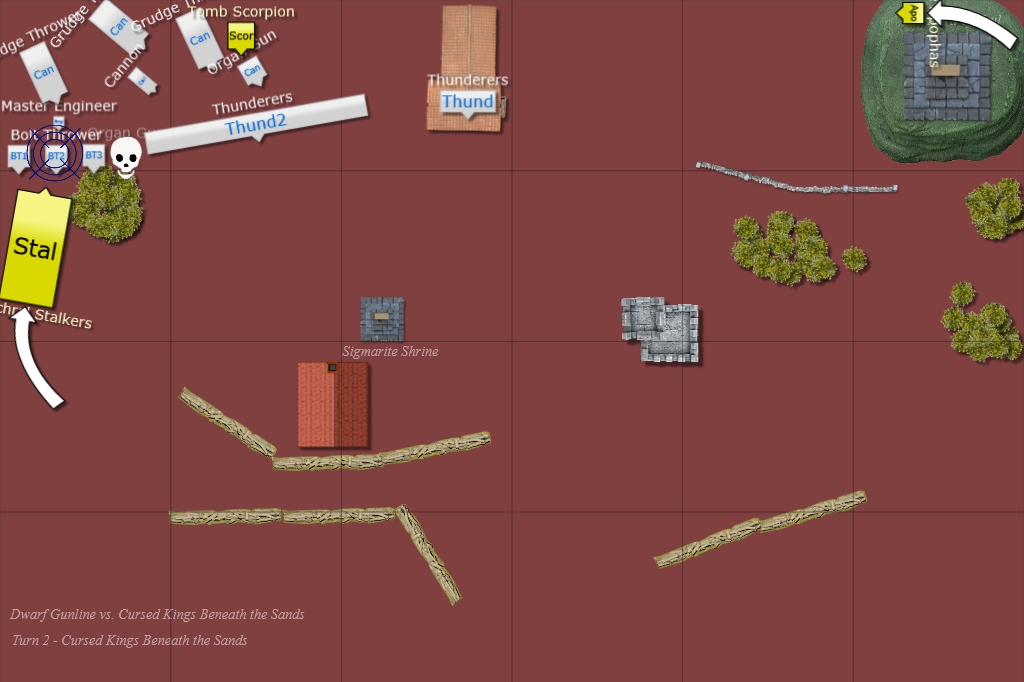
It seemed that crumble didn't effect EBtS singe it says on the battlefield. And those models came out after crumble.
My EBtS Roll was legendary. Beleave that only succesfull roll was those stalkers allthouth they scattered quite abit, hence that formation (as it only needed to touch the marker). That scorpion and apophas was missfire with shifting sands. Scorpion ended up randomly in good place. Apophas choosed to hunt that Master Engineer. All rest (2 x stalkers, 1 necropolish knight, scorpion) missfired and got ether 3 or 4... I couldn't believe my eyes when rolling those cursed dices.
Shooting phase was nice, I managed to destroy organ gun with stalkers (missfired one stalker, but got only 1 wound from it) and managed to panic that blue bolt thrower in process.
Turn analyze
- I really wondered how would my game being different if I would have gotten first turn and this moment my Herald would have been somewhere near those thunderers (especially If desert winds would have been succesfull) Too bad I didn't get that Necrotect with cloak of dunes on the board. He would have given 12 regeneration aura to animated constructs, and that movement trick would have been excelsior.
- Those stalkers really did great against warmachines.
Turn 3 - Dwarf Gunline
No movement for dwarfs again
Shooting was pretty awful for dwarwes. That stalker survived nicely against my opponent shooting. Organ gun killed scorpion =(
Turn 3 - Cursed Kings Beneath the Sands
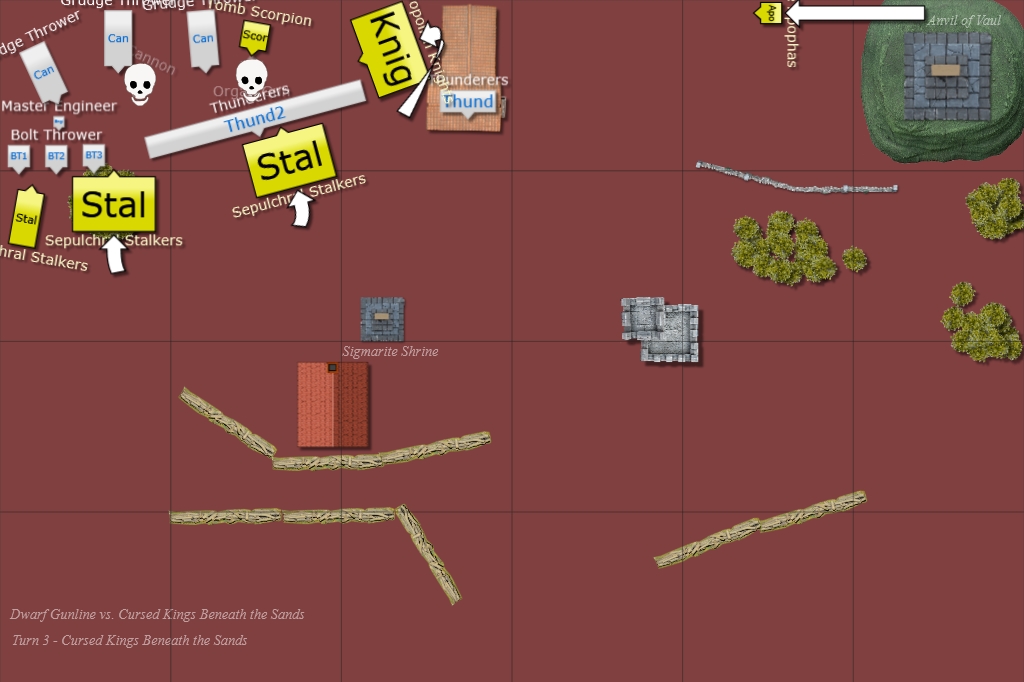
Stalker almost crumbled to death. I almost took them of board when I realized that animated constructs take 1 less damage from crumble he survived with one wound. Other EBtS rolls were succesfull but that another scorpion missfired and got shifting sands, but randomly got from north end ;) Those Necropolosh knight were actually pretty much in the flank of the large thunderer unit. ( I realized now that thunderer unit is in wrong angle. It was much steeper towards the back end.
Shooting was great. Cannon and Organ gun was destroyed. I managed to do 1 wound on master engineer with that remaining stalker.
Turn analyze:
- My EBtS worked just about right. I had hard decision with that stalker unit that is in the front of thunderers. I wanted to destroy that organ gun so it wouldn't kill my scorp. On the other hand it also denied reform from the thunderers... I think that was great choice.
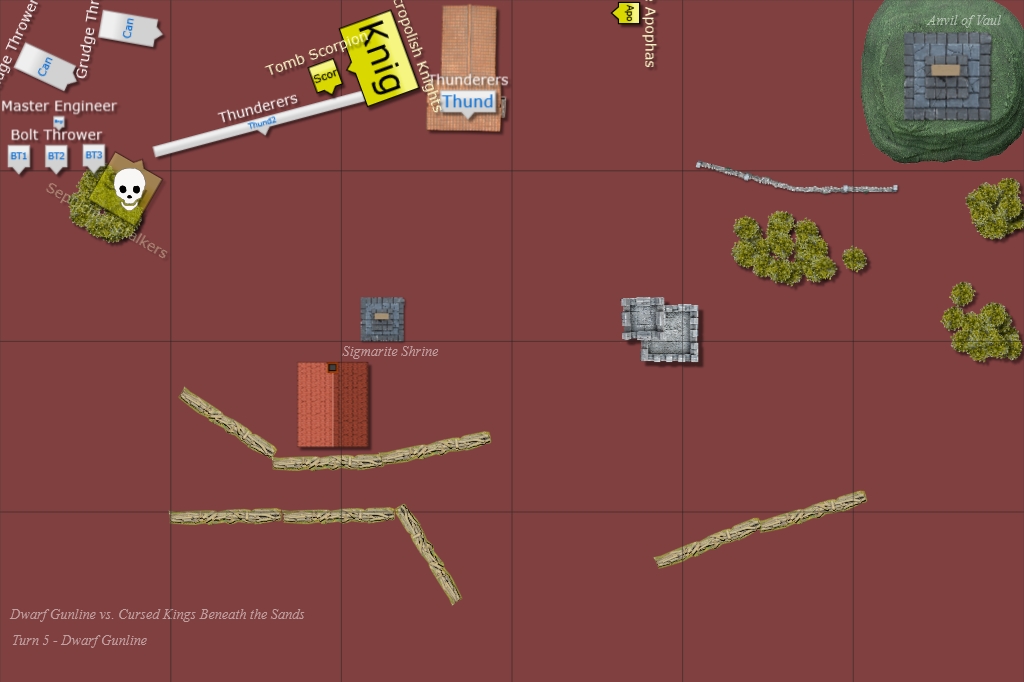
Turn 4 - Dwarf Gunline

Those housed dwarfs shooted apophas and got few wounds in. Thunderer unit anhilated stalkers in front of them. My opponent managed to hit my knights with those grudge throwers twice, but rolled 1 with high str and I managed to save all other wounds.
Turn 4 - Cursed Kings Beneath the Sands

No crumbles this time
I declared charge with tomb scorpion to that grudge trhower, and double charge with stalkers and necropolish knight. This picture isn't just about right, but those stalkers couldn't close the door on thunderers, and if thunderers would have closed door then knights wouldn't been able to finish the charge. So I had to fail those stalkers...
Scorpion managed to overrun from grudge thrower (and i runned him to the necropolishknight side in order to get attacks denied.
Turn Analyze:
- I really should have measured that bolt thrower / thunderer unit before declaring charge. My aprox eye really failed this time. Best course of action would have been chargin against those bolt throwers and aim it so that they overrun to next bolt. I probably lost the game to this mistake, since most likely I would have gotten few points more and those stalkers wouldn't been killed the next turn.
Turn 5 - Dwarf Gunline
Stalkers got killed by bolt throwers.
Those thunderers managed to stay put ( I rolled pretty bad close combat on average.)
Turn 5 - Cursed Kings Beneath the Sands

Apophas died due crumble. No crumble damage on scorpion or knights.
I managed to do some damage to thunderers, but they still hold.
Turn 6 - Dwarf Gunline
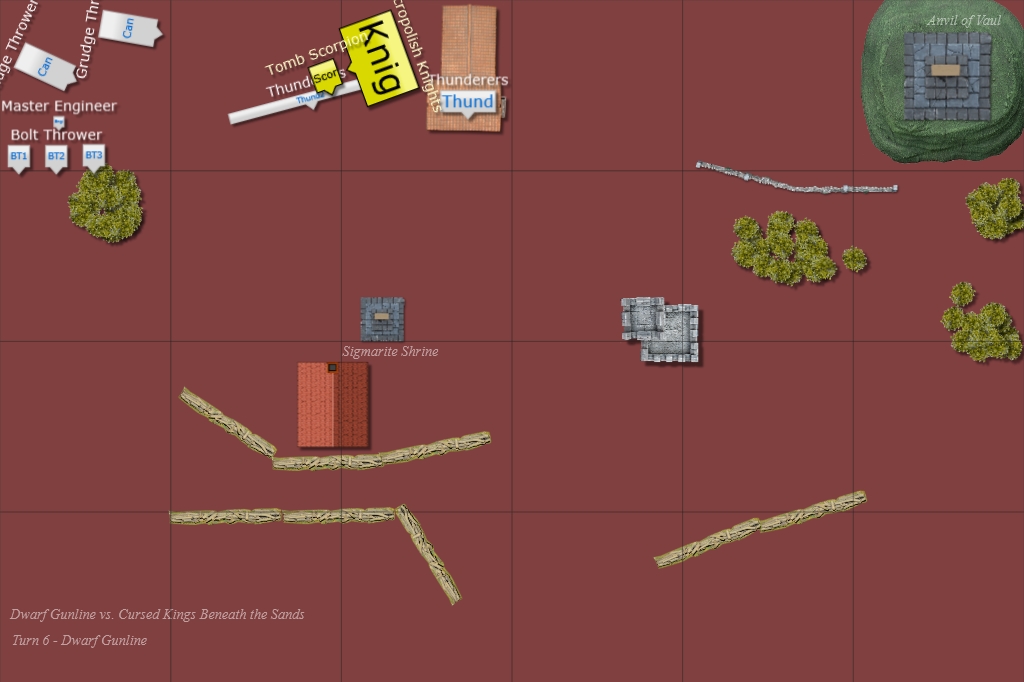
Thunderers made epic snake eye break test.
Turn analyze:
- This was extremely bad, since if they would have broken I prolly would got nice charge to grudge thrower and bolt thrower.
Turn 6 - Cursed Kings Beneath the Sands
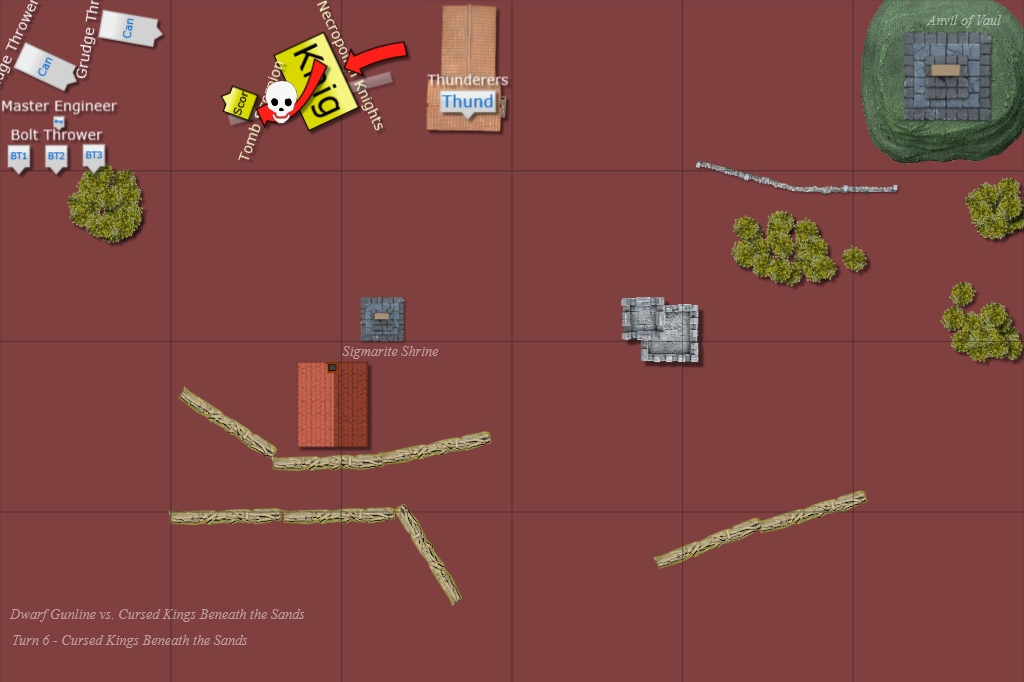
No curmble damage
Managed to break thunderers. Final score was 2273 - 2058
The Report is Copyright (c) 2009 Loriel. All rights reserved.
This document is completely unofficial and in no way endorsed by Games Workshop Limited. Chaos, the Chaos device, the Chaos logo, Citadel, Citadel Device, Darkblade, the Double-Headed/Imperial Eagle device, 'Eavy Metal, Forge World, Games Workshop, Games Workshop logo, Golden Demon, Great Unclean One, GW, the Hammer of Sigmar logo, Horned Rat logo, Keeper of Secrets, Khemri, Khorne, the Khorne logo, Lord of Change, Nurgle, the Nurgle logo, Skaven, the Skaven symbol devices, Slaanesh, the Slaanesh logo, Tomb Kings, Trio of Warriors, Twin Tailed Comet Logo, Tzeentch, the Tzeentch logo, Warhammer, Warhammer Online, Warhammer World logo, White Dwarf, the White Dwarf logo, and all associated marks, names, races, race insignia, characters, vehicles, locations, units, illustrations and images from the Warhammer world are either (r), TM and/or (c) Copyright Games Workshop Ltd 2000-2007, variably registered in the UK and other countries around the world. Used without permission. No challenge to their status intended. All Rights Reserved to their respective owners.
Component (c) 2010 Gerry Elliott. All rights reserved.
Component by Gerry Elliott is licensed under a Creative Commons Attribution-Non-Commercial-Share Alike 3.0 Unported License.
Component (c) DeeDee 2009. All rights reserved.
Component by DeeDee is licensed under a Creative Commons Attribution-Non-Commercial-Share Alike 3.0 Unported License.
Model made with bricks from a Hirst Arts Fantasy Architecture mold.
Component (c) Tom Wright 2009. All rights reserved.
Component by Tom Wright is licensed under a Creative Commons Attribution-Non-Commercial-Share Alike 3.0 Unported License.
An Item in an image (c) Games Workshop PLC 2009. All rights reserved. Used without permission
Component (c) Tom Wright 2010. All rights reserved.
Component by Tom Wright is licensed under a Creative Commons Attribution-Non-Commercial-Share Alike 3.0 Unported License.
Component is Copyright (c) 2009 Tom Wright. All rights reserved.
Component by Tom Wright is licensed under a Creative Commons Attribution-Non-Commercial-Share Alike 3.0 Unported License.
Component (c) Aaron Port 2009. All rights reserved.
Battle Chronicler Component by Aaron Port is licensed under a Creative Commons Attribution-Non-Commercial-Share Alike 3.0 Unported License.
